My BFF from High School's daughter is getting married in a few months. She and her mom both like Day of the Dead art, and they thought it would be fun to have the bride-to-be get her face painted as a skeleton and take some pictures with her wedding dress on. They asked me to paint her face, which I happily obliged. We went to a local cemetary to take some shots. We all had so much fun, there is now talk of taking the whole wedding party out the day after the wedding to paint and shoot again. Here are some of my favorites from the day:
She got a lot of attention, especially when we stopped in Little 5 Points to snap a couple of these. I love the idea of such a non-traditional take on a wedding, and it seems there are others across the interwebs who thought the same thing. Hoping we can incorporate some of this theme into her reception. :)
Monday, October 17, 2011
Monday, June 27, 2011
Sunday Night Dinner brought to you by Bloggers everywhere
Yes - I've been MIA lately. I got a new job. This is a pretty big deal for me since I was at my last gig for almost 7 years, and for a good chunk of those years, it's where I thought I would stay. But alas, things change, opportunities arise and I moved on. It's taken a lot of brain power to
a) wrap my head around the change
b) stay focused on the things I needed to do to wrap up at the last company
c) stay focused on the things I would need to carry forward to my new job
d) begin new job and have week 1 under my belt
Tomorrow I start week 2. It's all good though, and in the middle of all of that change and focus, we've had birthdays, summer school start and end for the big kid, the medium kid with us and lots of other life details big and small.
This weekend has really been the first weekend where I've felt free to relax. I don't have a bunch of if/then's or how or but's bouncing around in my brain. The change is done. Now I just have to settle into it. I have to remind myself that might take a little time even though I wanted to feel settled on my first day. But like I said, it is all good.
Like I was also saying, this weekend was the first one in quite sometime, where I felt a bit more relaxed and visited some of my favorite food blogs that I haven't seen much of over the past couple of months. I had lots of fun catching up on some great recipes and my hour's worth of browsing actually inspired over half of our dinner menus for the week, including tonight's which was so yummy.
For the main course we had:
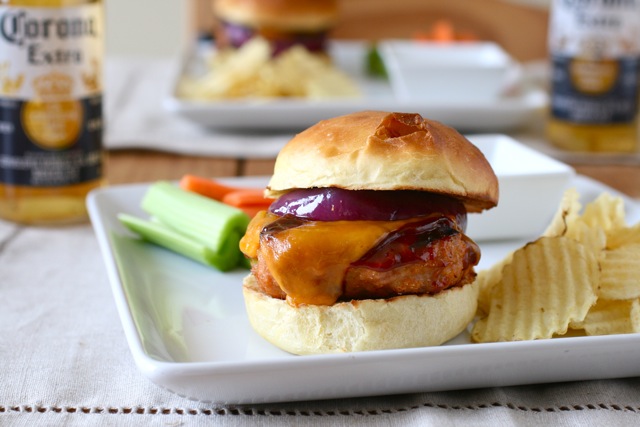
Barbeque Chicken Burgers via Annes-eats.com
Oh. My. Goodness. These were so tasty. You can find the recipe in the two links above. I modified ours a bit. First of all, I used a sourdough hamburger bun (toasted). I followed her burger recipe with the exception of cornmeal and scallions. We didn't have any, so I used breadcrumbs and a shallot instead. I also totally cheated and used bottle BBQ sauce since we had some on hand. Oh - and we didn't grill. I just cooked these on the stove, because it was on the verge of raining, but even with my modifications - these were fantastic. Oh, and I had lemonade with mine instead of beer. :)
Mexican Corn on the Cob via HomesickTexan.com
I decided to pair them with a tried and true favorite from one of Heather's favorite bloggers - Homesick Texan. We no longer have corn on the cob any other way than this. It is the bomb. Seriously. Unfortunately for us, we didn't have parmesan cheese (a good substitute for the cojita cheese) on hand, so we went without, but honestly the corn is still great. I love the hint of spice that the chipotle gives it.
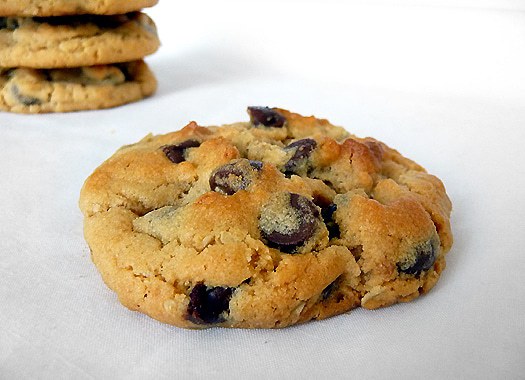
Chocolate Chip Peanut Butter Oatmeal Cookies via The Brown Eyed Baker
And to top dinner off, we had these. I met these cookies earlier this year when I made them for the night of the Oscar's. It was love at first bite. These have 3 of my favorite cookie ingredients all in one - chocolate chips, peanut butter and oatmeal. So good. I've made these many times since the Oscars. I do three things differently than the recipe. First, I just measure. Second, I make the cookies smaller than what the recipe calls for. Third - I don't make them into balls and twist - I find that just using a spoon to make a rough ball shape is all the action required to give them a "crinkly top" I also think I prefer using mini chocolate chips vs. the big ones. But, seriously - the cookie dough - addictive. So, so good. Go try them today. You won't regret it.
a) wrap my head around the change
b) stay focused on the things I needed to do to wrap up at the last company
c) stay focused on the things I would need to carry forward to my new job
d) begin new job and have week 1 under my belt
Tomorrow I start week 2. It's all good though, and in the middle of all of that change and focus, we've had birthdays, summer school start and end for the big kid, the medium kid with us and lots of other life details big and small.
This weekend has really been the first weekend where I've felt free to relax. I don't have a bunch of if/then's or how or but's bouncing around in my brain. The change is done. Now I just have to settle into it. I have to remind myself that might take a little time even though I wanted to feel settled on my first day. But like I said, it is all good.
Like I was also saying, this weekend was the first one in quite sometime, where I felt a bit more relaxed and visited some of my favorite food blogs that I haven't seen much of over the past couple of months. I had lots of fun catching up on some great recipes and my hour's worth of browsing actually inspired over half of our dinner menus for the week, including tonight's which was so yummy.
For the main course we had:
![]() |
| Photo respectfully borrowed from Annies-Eats.com |
Oh. My. Goodness. These were so tasty. You can find the recipe in the two links above. I modified ours a bit. First of all, I used a sourdough hamburger bun (toasted). I followed her burger recipe with the exception of cornmeal and scallions. We didn't have any, so I used breadcrumbs and a shallot instead. I also totally cheated and used bottle BBQ sauce since we had some on hand. Oh - and we didn't grill. I just cooked these on the stove, because it was on the verge of raining, but even with my modifications - these were fantastic. Oh, and I had lemonade with mine instead of beer. :)
| Photo respectfully borrowed from HomesickTexan.com |
I decided to pair them with a tried and true favorite from one of Heather's favorite bloggers - Homesick Texan. We no longer have corn on the cob any other way than this. It is the bomb. Seriously. Unfortunately for us, we didn't have parmesan cheese (a good substitute for the cojita cheese) on hand, so we went without, but honestly the corn is still great. I love the hint of spice that the chipotle gives it.
| Photo respectfully borrowed from browneyedbaker.com |
And to top dinner off, we had these. I met these cookies earlier this year when I made them for the night of the Oscar's. It was love at first bite. These have 3 of my favorite cookie ingredients all in one - chocolate chips, peanut butter and oatmeal. So good. I've made these many times since the Oscars. I do three things differently than the recipe. First, I just measure. Second, I make the cookies smaller than what the recipe calls for. Third - I don't make them into balls and twist - I find that just using a spoon to make a rough ball shape is all the action required to give them a "crinkly top" I also think I prefer using mini chocolate chips vs. the big ones. But, seriously - the cookie dough - addictive. So, so good. Go try them today. You won't regret it.
Tuesday, June 21, 2011
Pumpkin Chocolate Chip Muffins
Lelia is a regular fixture around our house during the summers and school breaks. She is Felicia's half sister, but Emily has claimed her as her full sister - even confusing her teachers at daycare for a few days by talking about her big sister. We love Lelia. Lelia loves Pumpkin Chocolate Chip Muffins, which is funny because we haven't had them since last fall, but she remembers them. So when I asked the kids what sorts of snacks they wanted in the car ride to Disney, she was the first to yell, "Pumpkin Chocolate Chip Muffins!" So I had to oblige by letting her make some.
I found this recipe awhile ago, over at Meal Makeover Moms. I've used a lot of their recipes over the past couple of years. Some I've adapted to our own tastes, and others I stay true to the recipe. This is one that doesn't need any tweaking. It's easy, good and best of all - the kids all love them!
Pumpkin Chocolate Chip Muffins
Ingredients
- 1 cup all-purpose flour
- 1/2 cup whole wheat flour
- 1/4 cup ground flaxseed or wheat germ
- 2 teaspoons baking powder
- 1/2 teaspoon cinnamon
- 1/4 teaspoon salt
- 1 cup canned pure pumpkin
- 2 large eggs, beaten
- 1/2 cup packed brown sugar
- 1/2 cup 1% lowfat milk
- 1/3 cup canola oil
- 1 teaspoon vanilla
- 1/2 cup mini chocolate chips
Directions
- Preheat the oven to 350°F. Lightly oil or coat 24 mini muffin cups with nonstick cooking spray and set aside.
- Whisk together the flours, ground flaxseed, baking powder, cinnamon, and salt in a large bowl. Combine the pumpkin, eggs, brown sugar, oil, milk, and vanilla in a medium bowl and stir until well combined. Pour the liquid ingredients over the dry ingredients and stir until just moistened. Stir in the chocolate chips.
- Spoon the batter into the prepared muffin cups. Bake 15 to 18 minutes until a toothpick inserted in the center comes out clean. Transfer the pan to a wire rack and cool 5 minutes. Remove the muffins and cool an additional 5 minutes before serving. When making 12 full-size muffins, bake for 20 to 23 minutes.
Monday, June 20, 2011
The lost birthday
Yes - it's been a few weeks. Life Happens. This week will be all about catch up so what better place to start than with my birthday.
We headed to Disney to celebrate my 40th birthday and Emily's 4th. This has been a trip that's been in the works for almost a year, and in hindsight, I'm happy we had all of the anticipation because that in itself was so much fun.
The first day we headed to Magic Kingdom, which also happened to be my birthday. We spent most of our time in Fantasyland. Emily loved It's a Small World. We met Pinocchio, which Emily loved despite not having a clue as to who he is (we still have some classics to catch up on).
Em wanted to eat every 5 seconds, so it made the morning a bit challenging and then it started to rain.
We headed to Disney to celebrate my 40th birthday and Emily's 4th. This has been a trip that's been in the works for almost a year, and in hindsight, I'm happy we had all of the anticipation because that in itself was so much fun.
The first day we headed to Magic Kingdom, which also happened to be my birthday. We spent most of our time in Fantasyland. Emily loved It's a Small World. We met Pinocchio, which Emily loved despite not having a clue as to who he is (we still have some classics to catch up on).
Em wanted to eat every 5 seconds, so it made the morning a bit challenging and then it started to rain.
And it rained. By this time my sister had taken Felicia and Lelia off for their own adventures and we decided to hunt the princesses down. Emily was most interested in seeing The Princess and the Frog, so we found her garden and we waited. And waited. And waited. After an hour, it started to rain again but the princess keepers came and got us and led us to a gazebo area that was covered, and there we met the beautiful Princess Tiana. She was very sweet and had the perfect New Orleans drawl.
After that, we decided to head back to the hotel while Liz and the girls stayed to enjoy the Electric Light Parade.
I had not felt great the day before - I slept a lot of the afternoon, so when we got back from the Magic Kingdom, I laid down again, and then proceeded to stay in bed for the next 2.5 days with an oh-so-fun-but-not-so-magical stomach bug.
While I hung out in the room, the rest of the family went on to enjoy the Animal Kingdom on day 2 and Blizzard Beach on Day 3.
The met lots of characters - Goofy was a favorite, and Emily lasted each day until about 2-3pm, which I thought was pretty good for her.
Heather and Felicia took part in one of their favorite traditions - the eating of the sour candy. This is something I will never understand, because I long ago gave up the notion that sucking up a bunch of sour powdered candy was fun, but they do it whenever they find the stuff and I do my part by taking pictures.
The last day I was feeling better and we ALL headed to Epcot, and we started it off with breakfast with the princesses. We met Belle, Aurora and Cinderella. Watching Emily watch the princesses was priceless. She was wide-eyed and excited. When they came up to us, she got a little more shy, but was still thrilled with the whole experience.
We hung out in the land area, and visited the Nemo area. The most impressive experience of Epcot to me was the Talking Crush show. Kids and People got to interact with Crush the Turtle from Nemo and it was really really cool how they did it. Heather, Em, Leila and I headed back to the hotel around lunch time and proceeded to enjoy the afternoon at the pool.
It was definitely not the trip I was anticipating, but it was nice to have a break and overall I think the kids really enjoyed the experience. I feel fortunate to have had the opportunity to go, and look forward to our next trip - probably in a few years - where, with some luck, we'll all be able to enjoy the entire adventure!
Tuesday, June 7, 2011
Change
There is a LOT going on in my world right now. It's all good stuff, but I'm trying to be smart about not trying to take EVERYTHING on at once. So if you don't see a lot of me in the next week or two, it's because I'm trying to focus on the really big transitional items in my life right now. Hopefully the dust will settle soon and I'll be able to share and get back to normal green bird ramblings. For now, just know that these two songs have been on heavy repeat in my internal playlist. Yes - the Brady Bunch sing inside my head more than I should probably admit. :)
Wednesday, June 1, 2011
celebrating 40 (things about me)
My birthday is today - June 1. I love my birthday and I love making a big deal about it. But what a lot of my friends and family probably don't know is that I also get quite introspective around my birthday. I think a lot about what I've done over the past year, what goals I've met and not quite met and where I want to go. This year is the big 4-0 and I find that the decade years are always a good time to reset. I've been looking to 40 for quite some time. The older I get, the more comfortable I get in my own skin, and I can't help but think that with that forward motion the decade of 40 is going to rock.
In addition to all of the reminiscing, thinking and daydreaming I've been doing around the big day, I decided to celebrate myself in doodle + word. This was a lot of fun and it was something I did over a couple of days whenever I had a few minutes. Totally recommend this for everyone big and small! Here's the list I came up with:
1. I am a mom and an aunt mom
2. I try to see the good in people
3. I am a gurl
4. I love flowers
5. I am creative
6. I am funny
7. I am a dreamer
8. I am silly
9. I am honest
10. I am a good sister
11. I have more good days than bad
12. I am getting better with boundaries
13. I cry at (some) tv commercials
14. I celebrate
15. I imagine
16. I make mistakes
17. I don't know everything
19. I make goals (and sometimes reach them)
20. I am a good person
21. I love to sing
22. I am inspired
23. I am not perfect
24. I love swirls
25. I still love my tattoo
26. I can be shy
27. I have great friends
28. I am learning to trust my gut everyday
29. My own skin gets comfier with age
30. I like swirls and polka dots (also see 16 and 24, since I have two references to swirls)
32. I love blowing bubbles
33. I believe in ghosts.
34. I am goofy
35. I would totally climb up the beanstalk
36. I get scared.
37. I don't hang out with negative voices.
38. I get starstruck
39. I love a good challenge
In addition to all of the reminiscing, thinking and daydreaming I've been doing around the big day, I decided to celebrate myself in doodle + word. This was a lot of fun and it was something I did over a couple of days whenever I had a few minutes. Totally recommend this for everyone big and small! Here's the list I came up with:
1. I am a mom and an aunt mom
2. I try to see the good in people
3. I am a gurl
4. I love flowers
5. I am creative
6. I am funny
7. I am a dreamer
8. I am silly
9. I am honest
10. I am a good sister
11. I have more good days than bad
12. I am getting better with boundaries
13. I cry at (some) tv commercials
14. I celebrate
15. I imagine
16. I make mistakes
17. I don't know everything
19. I make goals (and sometimes reach them)
20. I am a good person
21. I love to sing
22. I am inspired
23. I am not perfect
24. I love swirls
25. I still love my tattoo
26. I can be shy
27. I have great friends
28. I am learning to trust my gut everyday
29. My own skin gets comfier with age
30. I like swirls and polka dots (also see 16 and 24, since I have two references to swirls)
32. I love blowing bubbles
33. I believe in ghosts.
34. I am goofy
35. I would totally climb up the beanstalk
36. I get scared.
37. I don't hang out with negative voices.
38. I get starstruck
39. I love a good challenge
Happy Birthday to me!
Monday, May 30, 2011
Guest Post: Memorial Day Honorabilia
My dear friend Megan shared this idea on Facebook, and I fell so instantly in love with the idea that I asked her if she would mind doing a guest post on my blog. She quickly agreed, and I'm so delighted and honored that she did. Check out this amazing idea for honoring those in your family who have served our country! To learn more about Megan, you can visit her blog aboutthesame.blogspot.com or you can find her on twitter @megstanish.
After getting over my initial grump about the lack of the marchy marchy in my immediate vicinity, I started to wonder about how I might incorporate something exciting into the weekend to help my children – who are 3 and 4 years old – start to “get” what Memorial Day is all about. I thought about placing a few hundred flags around my lawn, but I decided that would be less meaningful and more just plain old messy.
Then I thought about the idea that each flag at Arlington Cemetery stands with and for a veteran. After more pondering on this, I decided on the plan: set up a flag in my front yard for each of the four veterans in my family and create a simple “plaque” to name and honor each one.
When working on this project, two things are imperative from the get-go. First, if you plan to involve children, take a deep breath and realize that mess is an almost certain (and likely fun!) part of this project. Second, determine if you want your plaques to be relatively disposable or long-lasting. This second point will determine your materials. I decided that our plaques would be disposable. Why? Well, first of all, they’ll be sitting out on the lawn, so who knows what kinds of messes may come their way during the day? More importantly, I want to do this project anew every year with my kids as they grow and learn to appreciate the meaning of the day. I see this as an annual opportunity to reintroduce my children to their great-grandparents and to the heroism of each individual’s commitment to serve. I’m kind of a sucker for nostalgia.
For materials, you will need the following:
One 18”-to-24” tall American flag per veteran
White posterboard, preferably non-glossy (I used 20” x 27”)… 1 sheet for every 2 veterans
Paper print-out of a photo of each veteran (shoot for minimum 6” x 6”)
Glue stick, preferably heavy duty: 1 per child
Scissors
Black Sharpie or wide marker
The rest of your materials are up to you, but we used:
Several glitter colors: red, blue, gold
Blue and red sequins
Gold sequin stars
U.S.A.-esque red, white and blue stickers
You could also use (for example):
Colored construction paper to cut out shapes to paste to the plaques
Paints, both regular and raised
Ribbon (which would probably require a hot-glue gun)
Making One Plaque
Cut the white posterboard in half; each half will become a plaque for a single veteran.
Using the glue stick, paste one veteran’s photo onto a plaque. Place the photo about 4 inches below the top of the plaque to ensure your veteran’s image is high enough off the ground to be seen from a distance but low enough to allow space for his or her name to be written at the top of the plaque. In tall lettering (3”-4” tall), print the veteran’s name across the top of the plaque; I recommend block lettering.
Next, allow your child or children to place stickers around the plaque. I know it’s tough not to help, but try not to direct the placement too much! However, I recommend reminding small children several times not to decorate the veterans’ faces, then watching them pretty closely. My 3-year-old did not heed this request during the sticker phase of the project, and after getting a good laugh about how “starry-eyed” my step-grandfather looked (yes, his eyes were covered with star stickers), we ended up reprinting and repasting his photo. Not a tragedy, but inconvenient.
After this, it’s up to you how best to decorate the plaque, depending on your preferences, materials and the child’s or children’s age(s). For us, our children’s ages and the fact that we really wanted them to be relatively independent with this project dictated us sticking with easily-glue-able and very sparkly materials. We poured piles of each color glitter and each type of sequin onto paper plates, for easy access by tiny hands. We then handed each child a glue stick and allowed them to create independently. For the adults, our jobs included pouring off excess glitter or sequins, encouraging the kids’ efforts and the ever-necessary ooh’ing and ah’ing.
Let the plaques dry, then shake off or replace any loose materials.
To wrap this up, I’ll share a little conversation I had with my 4-year-old tonight at bedtime. He asked me, “Mommy, why did we do that project for Memorial Day?” I thought a moment, then said, “Well, what are the first three syllables of the word ‘Memorial’?” Together we said, “Mem-o-ry.” I asked him, “So what does that make Memorial Day?” My lovely son smiled and said, “It’s a day for Remembering.” From out of the mouths of babes.
Memorial Day Honorabilia, Courtesy of the Kids
Earlier this week, I wrote a post on my blog about the lack of Memorial Day parades in the metro Atlanta area, where I currently live. In it, I made the case that these parades not only bring people together in celebration of those who have served our country, but they also serve the purpose of introducing the concept of Memorial Day to our children in an engaging way, allowing them to assimilate the true meaning of it as they grow and evolve.After getting over my initial grump about the lack of the marchy marchy in my immediate vicinity, I started to wonder about how I might incorporate something exciting into the weekend to help my children – who are 3 and 4 years old – start to “get” what Memorial Day is all about. I thought about placing a few hundred flags around my lawn, but I decided that would be less meaningful and more just plain old messy.
Then I thought about the idea that each flag at Arlington Cemetery stands with and for a veteran. After more pondering on this, I decided on the plan: set up a flag in my front yard for each of the four veterans in my family and create a simple “plaque” to name and honor each one.
When working on this project, two things are imperative from the get-go. First, if you plan to involve children, take a deep breath and realize that mess is an almost certain (and likely fun!) part of this project. Second, determine if you want your plaques to be relatively disposable or long-lasting. This second point will determine your materials. I decided that our plaques would be disposable. Why? Well, first of all, they’ll be sitting out on the lawn, so who knows what kinds of messes may come their way during the day? More importantly, I want to do this project anew every year with my kids as they grow and learn to appreciate the meaning of the day. I see this as an annual opportunity to reintroduce my children to their great-grandparents and to the heroism of each individual’s commitment to serve. I’m kind of a sucker for nostalgia.
For materials, you will need the following:
One 18”-to-24” tall American flag per veteran
White posterboard, preferably non-glossy (I used 20” x 27”)… 1 sheet for every 2 veterans
Paper print-out of a photo of each veteran (shoot for minimum 6” x 6”)
Glue stick, preferably heavy duty: 1 per child
Scissors
Black Sharpie or wide marker
The rest of your materials are up to you, but we used:
Several glitter colors: red, blue, gold
Blue and red sequins
Gold sequin stars
U.S.A.-esque red, white and blue stickers
You could also use (for example):
Colored construction paper to cut out shapes to paste to the plaques
Paints, both regular and raised
Ribbon (which would probably require a hot-glue gun)
Making One Plaque
Cut the white posterboard in half; each half will become a plaque for a single veteran.
Using the glue stick, paste one veteran’s photo onto a plaque. Place the photo about 4 inches below the top of the plaque to ensure your veteran’s image is high enough off the ground to be seen from a distance but low enough to allow space for his or her name to be written at the top of the plaque. In tall lettering (3”-4” tall), print the veteran’s name across the top of the plaque; I recommend block lettering.
Next, allow your child or children to place stickers around the plaque. I know it’s tough not to help, but try not to direct the placement too much! However, I recommend reminding small children several times not to decorate the veterans’ faces, then watching them pretty closely. My 3-year-old did not heed this request during the sticker phase of the project, and after getting a good laugh about how “starry-eyed” my step-grandfather looked (yes, his eyes were covered with star stickers), we ended up reprinting and repasting his photo. Not a tragedy, but inconvenient.
After this, it’s up to you how best to decorate the plaque, depending on your preferences, materials and the child’s or children’s age(s). For us, our children’s ages and the fact that we really wanted them to be relatively independent with this project dictated us sticking with easily-glue-able and very sparkly materials. We poured piles of each color glitter and each type of sequin onto paper plates, for easy access by tiny hands. We then handed each child a glue stick and allowed them to create independently. For the adults, our jobs included pouring off excess glitter or sequins, encouraging the kids’ efforts and the ever-necessary ooh’ing and ah’ing.
Let the plaques dry, then shake off or replace any loose materials.
To wrap this up, I’ll share a little conversation I had with my 4-year-old tonight at bedtime. He asked me, “Mommy, why did we do that project for Memorial Day?” I thought a moment, then said, “Well, what are the first three syllables of the word ‘Memorial’?” Together we said, “Mem-o-ry.” I asked him, “So what does that make Memorial Day?” My lovely son smiled and said, “It’s a day for Remembering.” From out of the mouths of babes.
Saturday, May 28, 2011
When I'm a mommy....
Em: When I get big and I'm a mommy, I will make you a grandmother.
Me: Yup.
Em: What kid am I going to have?
Me: I don't know - it's a surprise.
Em: What is my kid's name going to be?
Me: I don't know, but you get to choose it just like we chose your name when you were a baby.
Em: But I don't WANT a baby! I want a kid.
I know some new moms that might feel the same.
Hope your weekend is filled with wonder and big dreams.
Me: Yup.
Em: What kid am I going to have?
Me: I don't know - it's a surprise.
Em: What is my kid's name going to be?
Me: I don't know, but you get to choose it just like we chose your name when you were a baby.
Em: But I don't WANT a baby! I want a kid.
I know some new moms that might feel the same.
Hope your weekend is filled with wonder and big dreams.
Wednesday, May 25, 2011
Six month check-in: one little word
At the beginning of the year, I chose a word to carry with me throughout 2011. I spent the last 3 months of 2010 thinking about different words, but over and over again, I came back to the word, mindful, which became my word for the year. When I chose the word, I don't think I really had any clue as to how much of an impact it would have on my world.
I knew that I wanted to use the word as a way to set and keep intention. I spent a lot of 2010 pretty checked out. I didn't listen to myself, I didn't pay attention to my dreams or wants or interests consistently and I knew coming into 2011 those were areas I wanted to change. Being mindful of what I want, and more importantly, what I need has allowed me to communicate with others more effectively. It has allowed me to hold boundaries because I am mindful of what I need. It has helped me to say no to things that otherwise I might be prone to give in to. It has helped me create space in my life for things that are important to me and in doing so, I feel more confident and more clear on what I want and don't want in my life.
I knew that this would help me stay accountable for my goals, but what I didn't know was that it would allow me to hear feedback and criticism in a more constructive way. I mean, no one likes to hear that they are doing a bad job, but knowing what I want and need to do and recognizing the areas that still "need improvement" makes it easier to hear that feedback from other people. The result of this has been less negative self-talk. I can accept my imperfections more and can own up to the fact that I still fall short in some areas - like cleaning the cat box.
The most powerful part of this word selection so far has been the sense of accomplishment I have. I've set several small goals for myself, and while I haven't met them all, I am so proud of the ones I've achieved. I'm also proud of myself for setting so many to begin with. This act alone, is such a huge improvement over the past couple of years. I feel that I am living with intention - for myself and for my family. I'm listening to my gut and it's been such an awesome ride. Not each day has been perfect, and there have been LOTS of times over the past 6 months where I've fallen down, fallen short, lost my temper, lost my cool or felt out of control, but the process of getting out of those negative spaces or situations is becoming easier. I ask myself what I need. Sometimes I know right away. Sometimes I have to sit with it for a couple of days, but each time I've asked myself this question, I've figured it out.
I've also been able to compartmentalize certain areas better so that a negative situation in one area of my life does not negatively impact other areas. I think the biggest area I've seen this with has been my mommy skills. I am not a perfect mom. Sometimes I embarrass myself or can't believe the things that are coming out of my mouth, but there are times when I've had a crappy day at work and I just want to come home and whine or moan but then I think of the kind of mom I want to be and I'm getting better at being able to reset myself so I can be the happy, calm(er) mom that I'm trying to be. Again - I'm not at all perfect, but it all feels like good, forward progress, and who doesn't love that?
I'm really looking forward to the rest of the year with my little word.
I knew that I wanted to use the word as a way to set and keep intention. I spent a lot of 2010 pretty checked out. I didn't listen to myself, I didn't pay attention to my dreams or wants or interests consistently and I knew coming into 2011 those were areas I wanted to change. Being mindful of what I want, and more importantly, what I need has allowed me to communicate with others more effectively. It has allowed me to hold boundaries because I am mindful of what I need. It has helped me to say no to things that otherwise I might be prone to give in to. It has helped me create space in my life for things that are important to me and in doing so, I feel more confident and more clear on what I want and don't want in my life.
I knew that this would help me stay accountable for my goals, but what I didn't know was that it would allow me to hear feedback and criticism in a more constructive way. I mean, no one likes to hear that they are doing a bad job, but knowing what I want and need to do and recognizing the areas that still "need improvement" makes it easier to hear that feedback from other people. The result of this has been less negative self-talk. I can accept my imperfections more and can own up to the fact that I still fall short in some areas - like cleaning the cat box.
The most powerful part of this word selection so far has been the sense of accomplishment I have. I've set several small goals for myself, and while I haven't met them all, I am so proud of the ones I've achieved. I'm also proud of myself for setting so many to begin with. This act alone, is such a huge improvement over the past couple of years. I feel that I am living with intention - for myself and for my family. I'm listening to my gut and it's been such an awesome ride. Not each day has been perfect, and there have been LOTS of times over the past 6 months where I've fallen down, fallen short, lost my temper, lost my cool or felt out of control, but the process of getting out of those negative spaces or situations is becoming easier. I ask myself what I need. Sometimes I know right away. Sometimes I have to sit with it for a couple of days, but each time I've asked myself this question, I've figured it out.
I've also been able to compartmentalize certain areas better so that a negative situation in one area of my life does not negatively impact other areas. I think the biggest area I've seen this with has been my mommy skills. I am not a perfect mom. Sometimes I embarrass myself or can't believe the things that are coming out of my mouth, but there are times when I've had a crappy day at work and I just want to come home and whine or moan but then I think of the kind of mom I want to be and I'm getting better at being able to reset myself so I can be the happy, calm(er) mom that I'm trying to be. Again - I'm not at all perfect, but it all feels like good, forward progress, and who doesn't love that?
I'm really looking forward to the rest of the year with my little word.
Tuesday, May 24, 2011
Fairy Love
On Sunday we went to the Georgia Renaissance Festival. I wasn't sure how the day was going to go since this was the first big festival for Em. It started out a bit rocky, but after getting enough carbs in that little body to support her current growth spurt, she perked up and we managed to have a really fun day. The best part?
Those fairies up there.
Now, I've mentioned our fondness of fairies before, but I really wish there was a way I could send these fairies a thank you note and basket full of love, because I totally would. They made my little girl's day, even if we were a bit stalkerish about it. We first met them under the tree. Emily said hello and they were each very friendly and we asked to take a picture, which they accommodated.
From there we went on our merry way, only to find that they were doing a show in one of the pavilions a few hours later. We went in, and they brought her up to the front to meet the fairy queen who remembered her from earlier. They gave her some fairy dust and returned her back to me. That hand over mouth move she's got going on -- that's 'I'm really happy, but really shy' move.
We hung out in the show for awhile, but Em really wanted to get her face painted and then come back to see the fairies, so we snuck out and headed for the face painting tent, where she wound up with a unicorn on her arm. As soon as the painting was done, she turned to me and said, "Mommy, I want to show the fairies my unicorn." So being the supportive Mommy that I try to be, I said ok, and off we tromped to the other side of the park.
We returned to the pavilion only to find that the show was over, but I caught a glimpse of the fairies walking around a corner. We ran, and got about 30 feet away and I told Emily to run and catch them. Let me pause here to say that ordinarily the overly protective mama bear in me would have never have let her go that far away from me, but there were only about 4-6 other people in the area at that time and I really wanted to see if she'd go up without me. She took off and caught up to the fairies. She held her arm out, and they all stopped, turned around and cooed over her unicorn, and her. I almost burst into tears because of how proud and happy she was. She talked about them all the way home, before bed and throughout today.
They are magic, those fairies. They are.
Subscribe to:
Posts (Atom)