I have a couple of friends who are moms that claim they aren't creative or crafty. I might be willing to buy this load of bonk, but they happen to possess some of the most witty and creative minds I know. I've seen them in action. I know that they have great, creative ideas, and while maybe they don't feel like they could paint like Picasso or whip up a floral arrangement out of a paper plate, toothpicks and masking tape, I know they have a craft gene it in them somewhere. So this post is for them and for any other mom or person hanging around little people who want to do something fun, easy and yes - crafty.
Easter Egg Sun Catchers
What you need:
Clear Contact Paper
Tissue paper
Hole Punch
Scissors
Scrap paper
Pen
String, yarn or ribbon
Optional - other bits as desired (glitter, confetti, etc)
Gather all of your supplies up, and start by cutting up your tissue paper. A little goes a long way. I basically cut about 4 - 5" of 6 different sheets of tissue. You don't have to measure or be concerned about any particular kind of shape, unless of course you want to get extra fancy. We had about 30 minutes to kill after dinner the other night, so there wasn't time to get all fancy schmacy with the scissor work.
If you stack all of the tissue together before cutting, like I did, be sure to separate the pieces as you will want to work with single layers. It doesn't really matter if things get wrinkly during the process - this is not a perfect craft.
After the tissue is cut, you'll want to cut two pieces of contact paper. I didn't measure, but do a decent sized piece - I'd guess that our pieces were roughly 1.5' or 2' x 1.5' x 2' Again - it doesn't have to be perfect. Carefully peel the paper back from one of the sheets, and lay it sticky side up on a clean, dry surface.
From there, start placing the tissue paper on the contact paper. There's no rhyme or reason. This is a perfect activity for little people and something that even a 18-month-old could do, assuming they don't have a fascination about putting everything in their mouth, like most 18-month-olds I know. You'll want to fill up the space as much as possible. You can overlap the paper - it can be krinkled - it doesn't matter...just go to town!
If you choose to go with optional, shiny materials - add those bits towards the end. Again - there's no rhyme or reason. I used some random confetti I have on hand for Emily's gluing adventures. She was tickled that the handful I grabbed had a birthday cake in the mix, and she made it a point to know where the egg with the birthday cake was when we were all done.
Once you have most of the contact paper covered and you are satisfied with everything, remove the paper from the second sheet of contact paper and carefully lay over your work. It's helpful to have a second set of adult hands. With Emily being almost 4, she probably could have helped with this task but she was too busy crushing paper by this point to notice.
After you have the second sheet affixed, take some time to smooth out the project. Again - nothing fancy here - your hands will work fine.
Next up - grab your scrap paper and pen and create your template. I actually made two eggs - a big and smaller one. Of course, you can create other shapes - flowers, hearts, bunnies - go with your whim here and get crazy. Note the crease in my egg template - I took the easy way here and folded my paper in half and drew just half of the egg on the fold. From there I cut it out, and voila - a fairly symmetrical egg! Once you have your templates, just place them on top of the contact paper, trace as many shapes as you want, and cut them out.
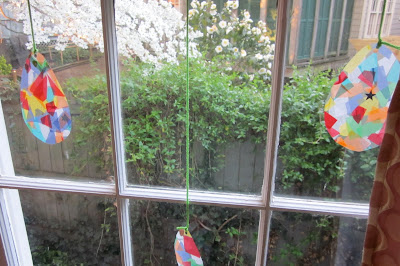
After your shapes are cut, use a hole punch to punch a hole at the top of your shape for hanging. From there, use your string/yarn/ribbon and tie a knot/bow to your egg for hanging. Staying true on my easy path, I opted for yarn and a simple double knot. Yes - I could have totally gone all Martha on this, but my kid gets impatient when I get into "that" zone, and at this point we were nearing bedtime routine time, and it was important to wrap it up. We punched, we tied and we hung and we had a great time doing it, and best of all, according to my darling daughter, "the Easter Bunny will see our house because we have all of the eggs in the window, right Mommy?" You got it, baby.


HI Missy...Great project...egg-citing! Thanks for joining in the Friday Follow fun! Following Back! Buzz! Buzz!
ReplyDeleteI'm going to dig out our tissue paper and buy some contact paper TODAY and do this with my 2 year old! I've been looking for different craft projects to do with him and this is perfect. Thank you for the idea and tutorial!
ReplyDeleteJennifer - thanks for the note - I hope that you and your son have a great time with these!
ReplyDelete